Author

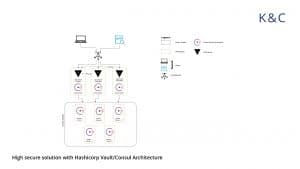
Hashicorp Consul/Vault As An Extra Security Layer When Using Kubernetes
In this edition of our Kubernetes consulting series, we look at the role of Hashicorp’s Consul and Vault as an additional security layer when using Kubernetes to orchestrate containers.
Kubernetes is one of the most advanced container orchestration systems used in contemporary microservices and serverless architectures. It’s compatible across Cloud vendors so can be used on AWS, Google Cloud Platform or Azure. Kubernetes orchestration provides heavy security, application scalability and most importantly, isolation for different types of products.
These features play a key role once you have started developing your app, as they ensure that your microservices, which work in containers, are isolated and secure from each other, so no intruder can affect the work of your entire ecosystem. But sometimes you need an extra layer of security, policy management, audit logging, system monitoring, or service discovery.
That’s where Consul and Vault really help to fortify the whole infrastructure. The implementation of Consul or Vault in Kubernetes, or Kubernetes itself is not an easy task. K&C has a great track record helping companies to achieve their goals in DevOps Services deployment. Furthermore, with Hashicorp Cloud Infrastructure, the development, deployment and security of application infrastructure will be easier and more effective. But what does each and every piece of the new software do, and why is it important to implement?
Hashicorp Consul – Service discovery and system orchestration
Static networking is a thing of the past, as nowadays systems require scalability and fast service discovery once new elements are added into the system. Consul provides dynamic networking and takes us away from the classic host-based systems and moves us to a service-based approach. Outside of the new networking changes, there won’t be static firewalls, as Consul moves us to dynamic service segmentation, meaning an entirely new level of security.
Additionally, due to complex Kubernetes ecosystems, we always need to keep track of our system’s health in order to know the load and identify other important indicators. Consul is a service discovery tool that allows you to know the load of every Pod in your infrastructure. This is done by registering all of your services and providing the HTTP and DNS interfaces. It can then get the query from different network elements to know the state. Now every service can dynamically discover and monitor the other service in a desired sequence and successfully communicate with it.
Consul cluster will store all the information about the cluster itself, health checks, the client’s services in /consul/data, as a volume. The container shows its data directory so the clients can see it, and if it disappears on the client side, it won’t affect any cluster operations. On the server side it stores the client’s information, snapshots, and other important data so the server can recover after an outage. Thus, teams have to take care of containers with consul cluster data, so they are not destroyed once a reboot is completed. When you are running Consul in a container, you have to make sure that an appropriate client address and cluster addresses are assigned. Moreover, you need to add the cluster address when it has just started, to make sure that it finds the correct interface and advertises one that it deems workable to the rest of the Consul participants.
Security is ensured via TLS certificates, service-to-service communication and identity based authorization. Consul can segment the network into different parts, providing each part with its privileges and communication policies without IP-based rules. If it’s not enough and you want to add an extra layer of security, then here’s where Vault comes into play…
Hashicorp Vault – the top-notch secret management solution
Communication between applications and systems can be vulnerable, and what can really solve the situation of unauthorized access are dynamically created secrets. These secrets are created and exist only when apps or services really need them, and that’s a fantastic feature, because no-one actually knows the secrets and passwords. Moreover, apps and services expect secrets to expire at some point in time. Communication between apps and services have become more reliable with Vault.
These practices allow Vault to avoid providing random users with root privileges to underlying systems. Furthermore, it can also revoke secrets and do key rolling.
Kubernetes Represents a Secure Alliance
Kubernetes clusters provide a couple of heavy security layers that can make your system bulletproof in every way. Furthermore, Consul will allow you to monitor your system’s health and if there is a problem, then it can easily be spotted. Vault provides the possibility to add an additional layer of security in communication between the different network elements, as not only will dynamic secrets protect your company from unnecessary password leaks, but it will ensure that there’s no actual password that can be leaked at all.
Before you start to implement the Consul you have to install the following:
1.consul
Generation of TLS Certificates
RPS communication between each Consul element will be encrypted with TLS. Now we have to Initiate Certificate Authority (CA):
ca-config.json

{
  "signing": {
    "default": {
      "expiry": "8760h"
    },
    "profiles": {
      "default": {
        "usages": ["signing", "key encipherment", "server auth", "client auth"],
        "expiry": "8760h"
      }
    }
  }
}


ca-csr.json

{
  "hosts": [
    "cluster.local"
  ],
  "key": {
    "algo": "rsa",
    "size": 2048
  },
  "names": [
    {
      "C": "US",
      "L": "Portland",
      "O": "Kubernetes",
      "OU": "CA",
      "ST": "Oregon"
    }
  ]


consul-csr.json

{
  "CN": "server.dc1.cluster.local",
  "hosts": [
    "server.dc1.cluster.local",
    "127.0.0.1"
  ],
  "key": {
    "algo": "rsa",
    "size": 2048
  },
  "names": [
    {
      "C": "US",
      "L": "Portland",
      "O": "Comnsul",
      "OU": "Consul",
      "ST": "Oregon"
    }
  ]
}

cfssl gencert -initca ca-csr.json | cfssljson -bare ca
Create certificate and key for Consul:
cfssl gencert
  -ca=ca.pem
  -ca-key=ca-key.pem
  -config=ca/ca-config.json
  -profile=default
  ca/consul-csr.json | cfssljson -bare consul
Now we have the following files:
ca-key.pem
ca.pem
consul-key.pem
consul.pem
Generate the Consul Gossip Encryption Key
Gossip communication between Consul elements will be encrypted with a shared key. Generate and save the key:
GOSSIP_ENCRYPTION_KEY=$(consul keygen)
Creating the Consul Secret and ConfigMap
Saving gossip key and TLS Certificates in Secret:
kubectl create secret generic consul
  --from-literal="gossip-encryption-key=${GOSSIP_ENCRYPTION_KEY}"
  --from-file=ca.pem
  --from-file=consul.pem
  --from-file=consul-key.pem
Now we have to save Consul Configuration in ConfigMap:
kubectl create configmap consul --from-file=server.json

server.json:

{
  "ca_file": "/etc/tls/ca.pem",
  "cert_file": "/etc/tls/consul.pem",
  "key_file": "/etc/tls/consul-key.pem",
  "verify_incoming": true,
  "verify_outgoing": true,
  "verify_server_hostname": true,
  "ports": {
    "https": 8443
  }
}
Consul Service
kubectl create -f service.yaml
service.yaml:
apiVersion: v1
kind: Service
metadata:
  name: consul
  labels:
    name: consul
spec:
  clusterIP: None
  ports:
    - name: http
      port: 8500
      targetPort: 8500
    - name: https
      port: 8443
      targetPort: 8443
    - name: rpc
      port: 8400
      targetPort: 8400
    - name: serflan-tcp
      protocol: "TCP"
      port: 8301
      targetPort: 8301
    - name: serflan-udp
      protocol: "UDP"
      port: 8301
      targetPort: 8301
    - name: serfwan-tcp
      protocol: "TCP"
      port: 8302
      targetPort: 8302
    - name: serfwan-udp
      protocol: "UDP"
      port: 8302
      targetPort: 8302
    - name: server
      port: 8300
      targetPort: 8300
    - name: consuldns
      port: 8600
      targetPort: 8600
  selector:
    app: consul
StatfulSet
Deploying 3 Pods:
kubectl create -f statefulset.yaml
statefulset.yaml:
apiVersion: apps/v1beta1
kind: StatefulSet
metadata:
  name: consul
spec:
  serviceName: consul
  replicas: 5
  template:
    metadata:
      labels:
        app: consul
    spec:
      affinity:
        podAntiAffinity:
          requiredDuringSchedulingIgnoredDuringExecution:
            - labelSelector:
                matchExpressions:
                  - key: app
                    operator: In
                    values:
                      - consul
              topologyKey: kubernetes.io/hostname
      terminationGracePeriodSeconds: 10
      securityContext:
        fsGroup: 1000
      containers:
        - name: consul
          image: "consul:1.2.0"
          env:
            - name: POD_IP
              valueFrom:
                fieldRef:
                  fieldPath: status.podIP
            - name: GOSSIP_ENCRYPTION_KEY
              valueFrom:
                secretKeyRef:
                  name: consul
                  key: gossip-encryption-key
            - name: NAMESPACE
              valueFrom:
                fieldRef:
                  fieldPath: metadata.namespace
          args:
            - "agent"
            - "-advertise=$(POD_IP)"
            - "-bind=0.0.0.0"
            - "-bootstrap-expect=3"
            - "-retry-join=consul-0.consul.$(NAMESPACE).svc.cluster.local"
            - "-retry-join=consul-1.consul.$(NAMESPACE).svc.cluster.local"
            - "-retry-join=consul-2.consul.$(NAMESPACE).svc.cluster.local"
            - "-client=0.0.0.0"
            - "-config-file=/consul/myconfig/server.json"
            - "-datacenter=dc1"
            - "-data-dir=/consul/data"
            - "-domain=cluster.local"
            - "-encrypt=$(GOSSIP_ENCRYPTION_KEY)"
            - "-server"
            - "-ui"
            - "-disable-host-node-id"
          volumeMounts:
            - name: config
              mountPath: /consul/myconfig
            - name: tls
              mountPath: /etc/tls
          lifecycle:
            preStop:
              exec:
                command:
                - /bin/sh
                - -c
                - consul leave
          ports:
            - containerPort: 8500
              name: ui-port
            - containerPort: 8400
              name: alt-port
            - containerPort: 53
              name: udp-port
            - containerPort: 8443
              name: https-port
            - containerPort: 8080
              name: http-port
            - containerPort: 8301
              name: serflan
            - containerPort: 8302
              name: serfwan
            - containerPort: 8600
              name: consuldns
            - containerPort: 8300
              name: server
      volumes:
        - name: config
          configMap:
            name: consul
        - name: tls
          secret:
            secretName: consul
Checking the launched nodes:
kubectl get pods

NAME READY STATUS RESTARTS AGE
consul-0 1/1 Running 0 50s
consul-1 1/1 Running 0 29s
consul-2 1/1 Running 0 15s
Final Check
Forward the port to the local machine:
kubectl port-forward consul-1 8500:8500

Forwarding from 127.0.0.1:8500 -> 8500
Forwarding from [::1]:8500 -> 8500
Run the command:
consul members
Node Address Status Type Build Protocol DC
consul-0 10.176.4.30:8301 alive server 1.2.0 2 dc1
consul-1 10.176.4.31:8301 alive server 1.2.0 2 dc1
consul-2 10.176.1.16:8301 alive server 1.2.0 2 dc1
Check the Web-UI
Simply open the https://127.0.0.1:8500 in your browser.
If all the steps above were done correctly, then you have the Consul ready to help with your needs.
Vault Implementation
We’ll be running Vault in Kubernetes, first of all we have to create the configuration file vault.hcl and insert the following:
disable_cache = true
disable_mlock = true

ui = true

listener "tcp" {
  address 	= "127.0.0.1:8200"
  tls_disable = 1
}

storage "consul" {
  address = "127.0.0.1:8500"
  path    = "mycompany/"
  disable_registration = "true"
}

max_lease_ttl = "10h"
default_lease_ttl = "10h"
raw_storage_endpoint = true
cluster_name = "mycompany-vault"
Creating ConfigMap:
$ kubectl create configmap vault --from-file=vault.hcl
Creating service.yaml:
apiVersion: v1
kind: Service
metadata:
  name: vault
  labels:
    app: vault
spec:
  type: ClusterIP
  ports:
    - port: 8200
      targetPort: 8200
      protocol: TCP
      name: vault
  selector:
    app: vault
Create deployment.yaml as well:
apiVersion: extensions/v1beta1
kind: Deployment
metadata:
  name: vault
  labels:
    app: vault
spec:
  replicas: 1
  template:
    metadata:
      labels:
        app: vault
    spec:
      containers:
      - name: vault
        command: ["vault", "server", "-config", "/vault/config/vault.hcl"]
        image: "vault:0.10.3"
        imagePullPolicy: IfNotPresent
        securityContext:
          capabilities:
            add:
              - IPC_LOCK
        volumeMounts:
          - name: configurations
            mountPath: /vault/config/vault.hcl
            subPath: vault.hcl
      - name: consul-vault-agent
        image: "consul:1.2.0"
        env:
          - name: GOSSIP_ENCRYPTION_KEY
            valueFrom:
              secretKeyRef:
                name: consul
                key: gossip-encryption-key
          - name: NAMESPACE
            valueFrom:
              fieldRef:
                fieldPath: metadata.namespace
        args:
          - "agent"
          - "-retry-join=consul-0.consul.$(NAMESPACE).svc.cluster.local"
          - "-retry-join=consul-1.consul.$(NAMESPACE).svc.cluster.local"
          - "-retry-join=consul-2.consul.$(NAMESPACE).svc.cluster.local"
          - "-encrypt=$(GOSSIP_ENCRYPTION_KEY)"
          - "-domain=cluster.local"
          - "-datacenter=dc1"
          - "-disable-host-node-id"
          - "-node=vault-1"
        volumeMounts:
            - name: config
              mountPath: /consul/config
            - name: tls
              mountPath: /etc/tls
      volumes:
        - name: configurations
          configMap:
            name: vault
        - name: config
          configMap:
            name: consul
        - name: tls
          secret:
            secretName: consul
Applying Changes
$ kubectl apply -f service.yaml
$ kubectl apply -f deployment.yaml
If everything was done correctly, then we should see that the service is working. Let’s begin the initialization and port forwarding to your local machine:
$ kubectl port-forward vault-6f8-z2rrj 8200:8200
Check the following in the other window:
$ export VAULT_ADDR=https://127.0.0.1:8200
For convenience, we’ll make initialization with one unsealed key.
$ vault operator init -key-shares=1 -key-threshold=1

Unseal Key 1: DKoe652D**************yio9idW******BlkY8=
Initial Root Token: 95633ed2-***-***-***-faaded3c711e
Vault initialized with 1 key shares and a key threshold of 1. Please securely distribute the key shares printed above. When the Vault is re-sealed, restarted, or stopped, you must supply at least 1 of these keys to unseal it before it can start servicing requests. Vault does not store the generated master key. Without at least 1 key to reconstruct the master key, Vault will remain permanently sealed! It is possible to generate new unseal keys, provided you have a quorum of existing unseal keys shares. See “vault rekey” for more information.
Make sure to save the output that you are going to get at this stage, because we need the unseal keys and root token. Now we have to unpack the vault with an unseal key:
$ vault operator unseal <key 1>

Key         	Value
---         	-----
Seal Type   	shamir
Sealed          false
Total Shares    1
Threshold   	1
Version     	0.10.1
Cluster Name    vault-cluster-c9499a92
Cluster ID      3b8cce45-d64e-64bb-e41d-575c6d3a7e03
HA Enabled      false
Login into the vault with root token:
$ vault login <root token>

$ vault secrets list

Path          Type     	Description
----          ----     	-----------
cubbyhole/    cubbyhole    per-token private secret storage
identity/ 	identity 	identity store
secret/   	kv       	key/value secret storage
sys/          system   	system endpoints used for control, policy and debugging
Save the secret:
$ vault kv put secret/apikey key="my-test-key"

Key              Value
---              -----
created_time 	2018-07-13T11:03:22.584234492Z
deletion_time    n/a
destroyed        false
version          1We can even check it if we need to:$ vault kv get secret/apikey

====== Metadata ======
Key              Value
---              -----
created_time 	2018-07-13T11:03:22.584234492Z
deletion_time    n/a
destroyed        false
version          1
 === Data ===
Key    Value
---    -----
key    my-test-key
Update the secret:
$ vault kv put secret/apikey key="my-test-key" owner="dev"

Key              Value
---              -----
created_time 	2018-07-13T11:06:00.514309494Z
deletion_time    n/a
destroyed        false
version          2
It has created the second version of data in secret/apikey. Refresh it once more:
$ vault kv put secret/apikey owner="ops"

Key              Value
---              -----
created_time 	2018-07-13T11:09:52.457793677Z
deletion_time    n/a
destroyed        false
version          3
Now, let’s see what we’ve got:
$ vault kv get secret/apikey

====== Metadata ======
Key              Value
---              -----
created_time 	2018-07-13T11:09:52.457793677Z
deletion_time    n/a
destroyed        false
version          3
 ==== Data ====
Key      Value
---      -----
owner    ops
PUT refreshes all of the data in the secret. In order to add changes without losing the old data we have to run the following command:
$ vault kv patch secret/apikey year="2018"

Key              Value
---              -----
created_time 	2018-07-13T11:12:38.832500503Z
deletion_time    n/a
destroyed        false
version          4
Let’s check what we have got:
$ vault kv get secret/apikey

====== Metadata ======
Key              Value
---              -----
created_time 	2018-07-13T11:12:38.832500503Z
deletion_time    n/a
destroyed        false
version          4

==== Data ====
Key      Value
---      -----
owner    ops
year 	2018
By the way, you can work with different versions:
$ vault kv get -version=1 secret/apikey

====== Metadata ======
Key              Value
---              -----
created_time 	2018-07-13T11:03:22.584234492Z
deletion_time    n/a
destroyed        false
version          1
 === Data ===
Key    Value
---    -----
key    my-test-key
If all of the steps are executed successfully then you should have a fully working, deployed Vault, which will make a great addition to your ecosystem.


